This is for anyone to use, but I think would work well for non-profits to illustrate that they are "with it" when it comes to social media. This post also explores a few tools that can make you feel like you're better at web design, etc. than your training may indicate.
Therefore, I present a few design tools & shortcuts. After which, I'll show you how I used a couple of them to create this iPhone widget (which is active in the sidebar to the right):

Color Scheme - This page will help you pick colors for your design efforts (it is intended for web design, but you could get ideas for mail, etc.). You can choose from mono, complement, triad, tetrad, analogic & accented analogic and go from there. Important to note - if you have a specific color you want to use, you don't have to click through the wheel until you find it. Just select the RGB code and you can enter your color's code.

Photo Pencil Sketch - This tool let's you take a regular image and turn it into a pencil sketch, like the image below and the image on my bio page.
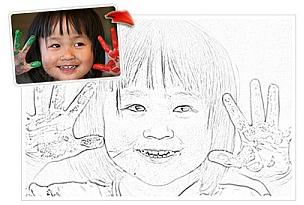
Image Map - I love this tool! You upload an image or identify its location on the web. From there, the tool makes it easy to map various parts of the image (rectangle or custom shapes) to links. If you visit the #31bnb page, you'll notice that the page is actually just one image with the links embedded throughout.
iPhone Icon- Great tool for transforming a regular image file into an iPhone-esque icon. It creates .ico & .png files in a .zip file.

Poladroid - For those missing the Polaroid cameras, this free software makes it easy to change a regular image file into a Polaroid print. I used it on my personal Twitter page. You can download the program here:

From my personal Twitter page:

So... How I made the iPhone-esque Widget using these tools:
This is my photo, but it should save you some time.
2) Consider which links you want to include. The photo includes:
- Homepage
- Bio
- Foursquare
- YouTube
- Delicious
- Flickr
- Technorati
- Map
- Presentations
- Buzz
- Blog
- Forrst
- RSS
- Phone (I used as a link to contact info)
So... the odds are you won't use some of those, namely my picture in the Bio, the Map function I used as a link, & maybe some others. That's okay. You likely have things you would like to replace them with. While you're at it, you may want to think about what you'll replace Google Buzz with when they pull the plug ;)
3) Now you can go to the iPhone icon tool above and create others to replace within the photo. The site is self-explanatory. Once you download and extract the files, the 64x64 file in the "png" folder can be copied-and-pasted over any of the icons in the base image. Do this until you have the image as you like.
4) For the titles of the "apps" I used Arial Rounded MT Bold, size 8 w/Bold turned off. Unless you want to replace all of the text, you can use that and the color of the other text. If you have Helvetica installed, that font is the actual iPhone font.
5) Save this image to wherever you host your files online.
6) Now, visit the image map page above. Load the file and follow the easy instructions. I would uncheck the following: "Show Text Links" & "Base URL." When you're finished, copy the code.
7) Load the code wherever you plan to place the image and you'll be good to go.
Let me know if you have any questions and I'll be happy to help however I can.


No comments:
Post a Comment